


How to Set Up Evomi Proxies in Multilogin: Step-by-Step

Nathan Reynolds

Setup Guides

Managing several browser profiles for legitimate work, such as running multiple e-commerce storefronts you own, verifying how your ads render across regions, or doing market research, usually means keeping each profile's environment cleanly separated. Multilogin handles the browser side of that separation through configurable browser fingerprints, while a good proxy handles the network side by giving each profile a distinct, stable IP address. This guide shows you exactly how to connect Evomi proxies to Multilogin so each profile routes its traffic through the IP you choose.

Why pair Evomi proxies with Multilogin?

Multilogin is an browser profile manager that lets you assign a separate browser configuration to each profile. On its own, though, every profile still shares your real network IP. Assigning a dedicated proxy to each profile completes the picture. Here's what Evomi adds:

  • A full range of proxy types: Residential, datacenter, mobile, and static ISP proxies, so you can match the IP type to the task, whether that's regional QA, price research, or managing accounts you legitimately own.

  • Transparent pricing: residential from $0.49/GB, datacenter from $0.30/GB, mobile from $2.2/GB, and static ISP from $1/IP. See the full breakdown on the pricing page.

  • Ethically sourced IPs: our network is built on consent-based sourcing and operated from Switzerland, a jurisdiction with high standards for privacy and quality.

  • Responsive support for any proxy configuration questions, plus free tools to verify your setup.

Use Evomi proxies within the terms of service of the platforms you visit, and only for data and accounts you have the right to access.

Know your endpoints before you start

Every Evomi plan uses a dedicated hostname and a set of ports for each protocol. You'll find your exact credentials in your Evomi dashboard, but here's the layout you'll be working with:

  • Residential Proxies: real-user IPs for tasks that need a genuine consumer footprint. Endpoint: rp.evomi.com

  • Datacenter Proxies: fast, budget-friendly IPs for speed-sensitive research and testing. Endpoint: dc.evomi.com

  • Mobile Proxies: carrier-network IPs for mobile app QA and social workflows. Endpoint: mp.evomi.com

  • Static ISP Proxies: dedicated, long-lived IPs that pair datacenter speed with ISP-grade stability. Endpoint: your assigned IP

Before you begin: prerequisites

You'll want two things ready:

  • An active Multilogin subscription (the code EVOMI30 gives you 30% off).

  • Your Evomi proxy credentials: the endpoint, port, username, and password from your Evomi dashboard.

If you haven't tried Evomi yet, there's a free trial on residential, mobile, and datacenter proxies so you can test everything before you commit.

Step 1: Create a new browser profile

Open Multilogin and, from the dashboard, choose the option to create a new browser profile.
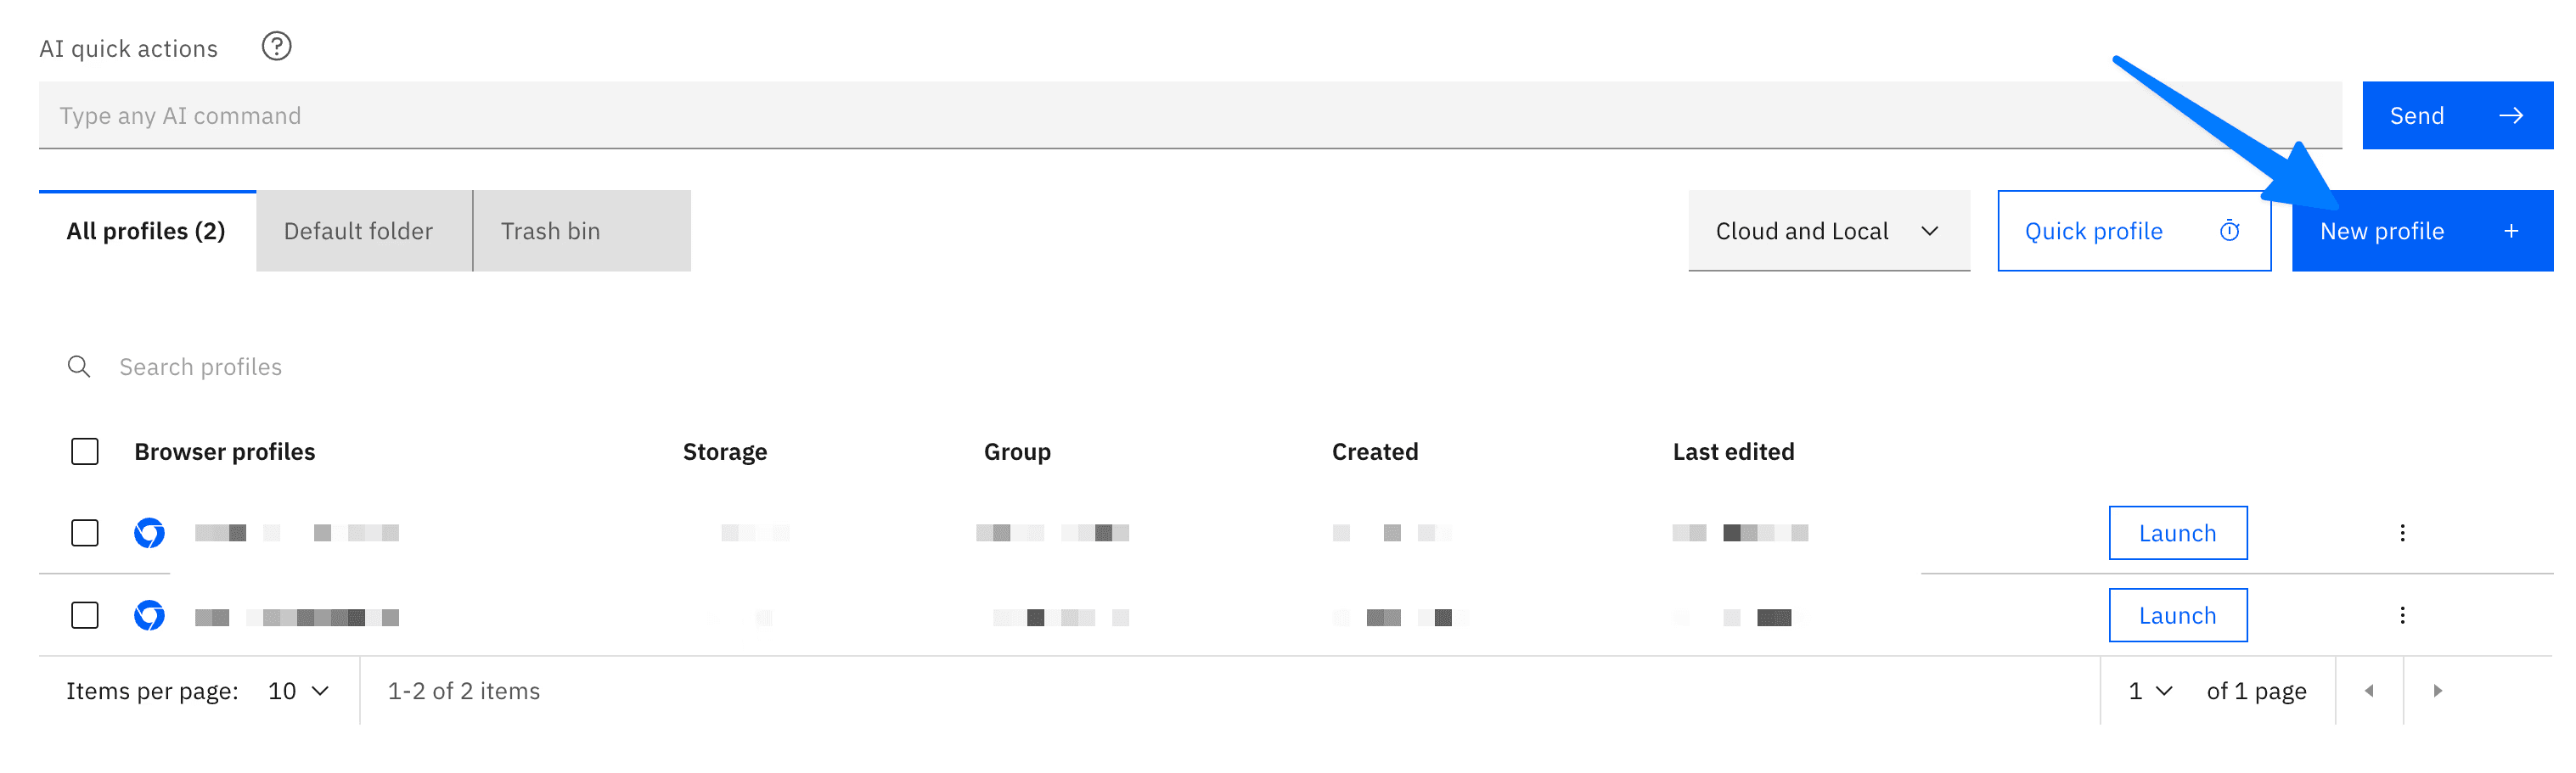
Creating a new browser profile in Multilogin

Give the profile a descriptive name, pick your operating system and browser type, and set any other fingerprint options you need for the task at hand.

Step 2: Open proxy settings and pick a connection type

Inside the profile creation or editing screen, find the Proxy section. Multilogin offers several connection types. To use Evomi, choose the Custom proxy type.
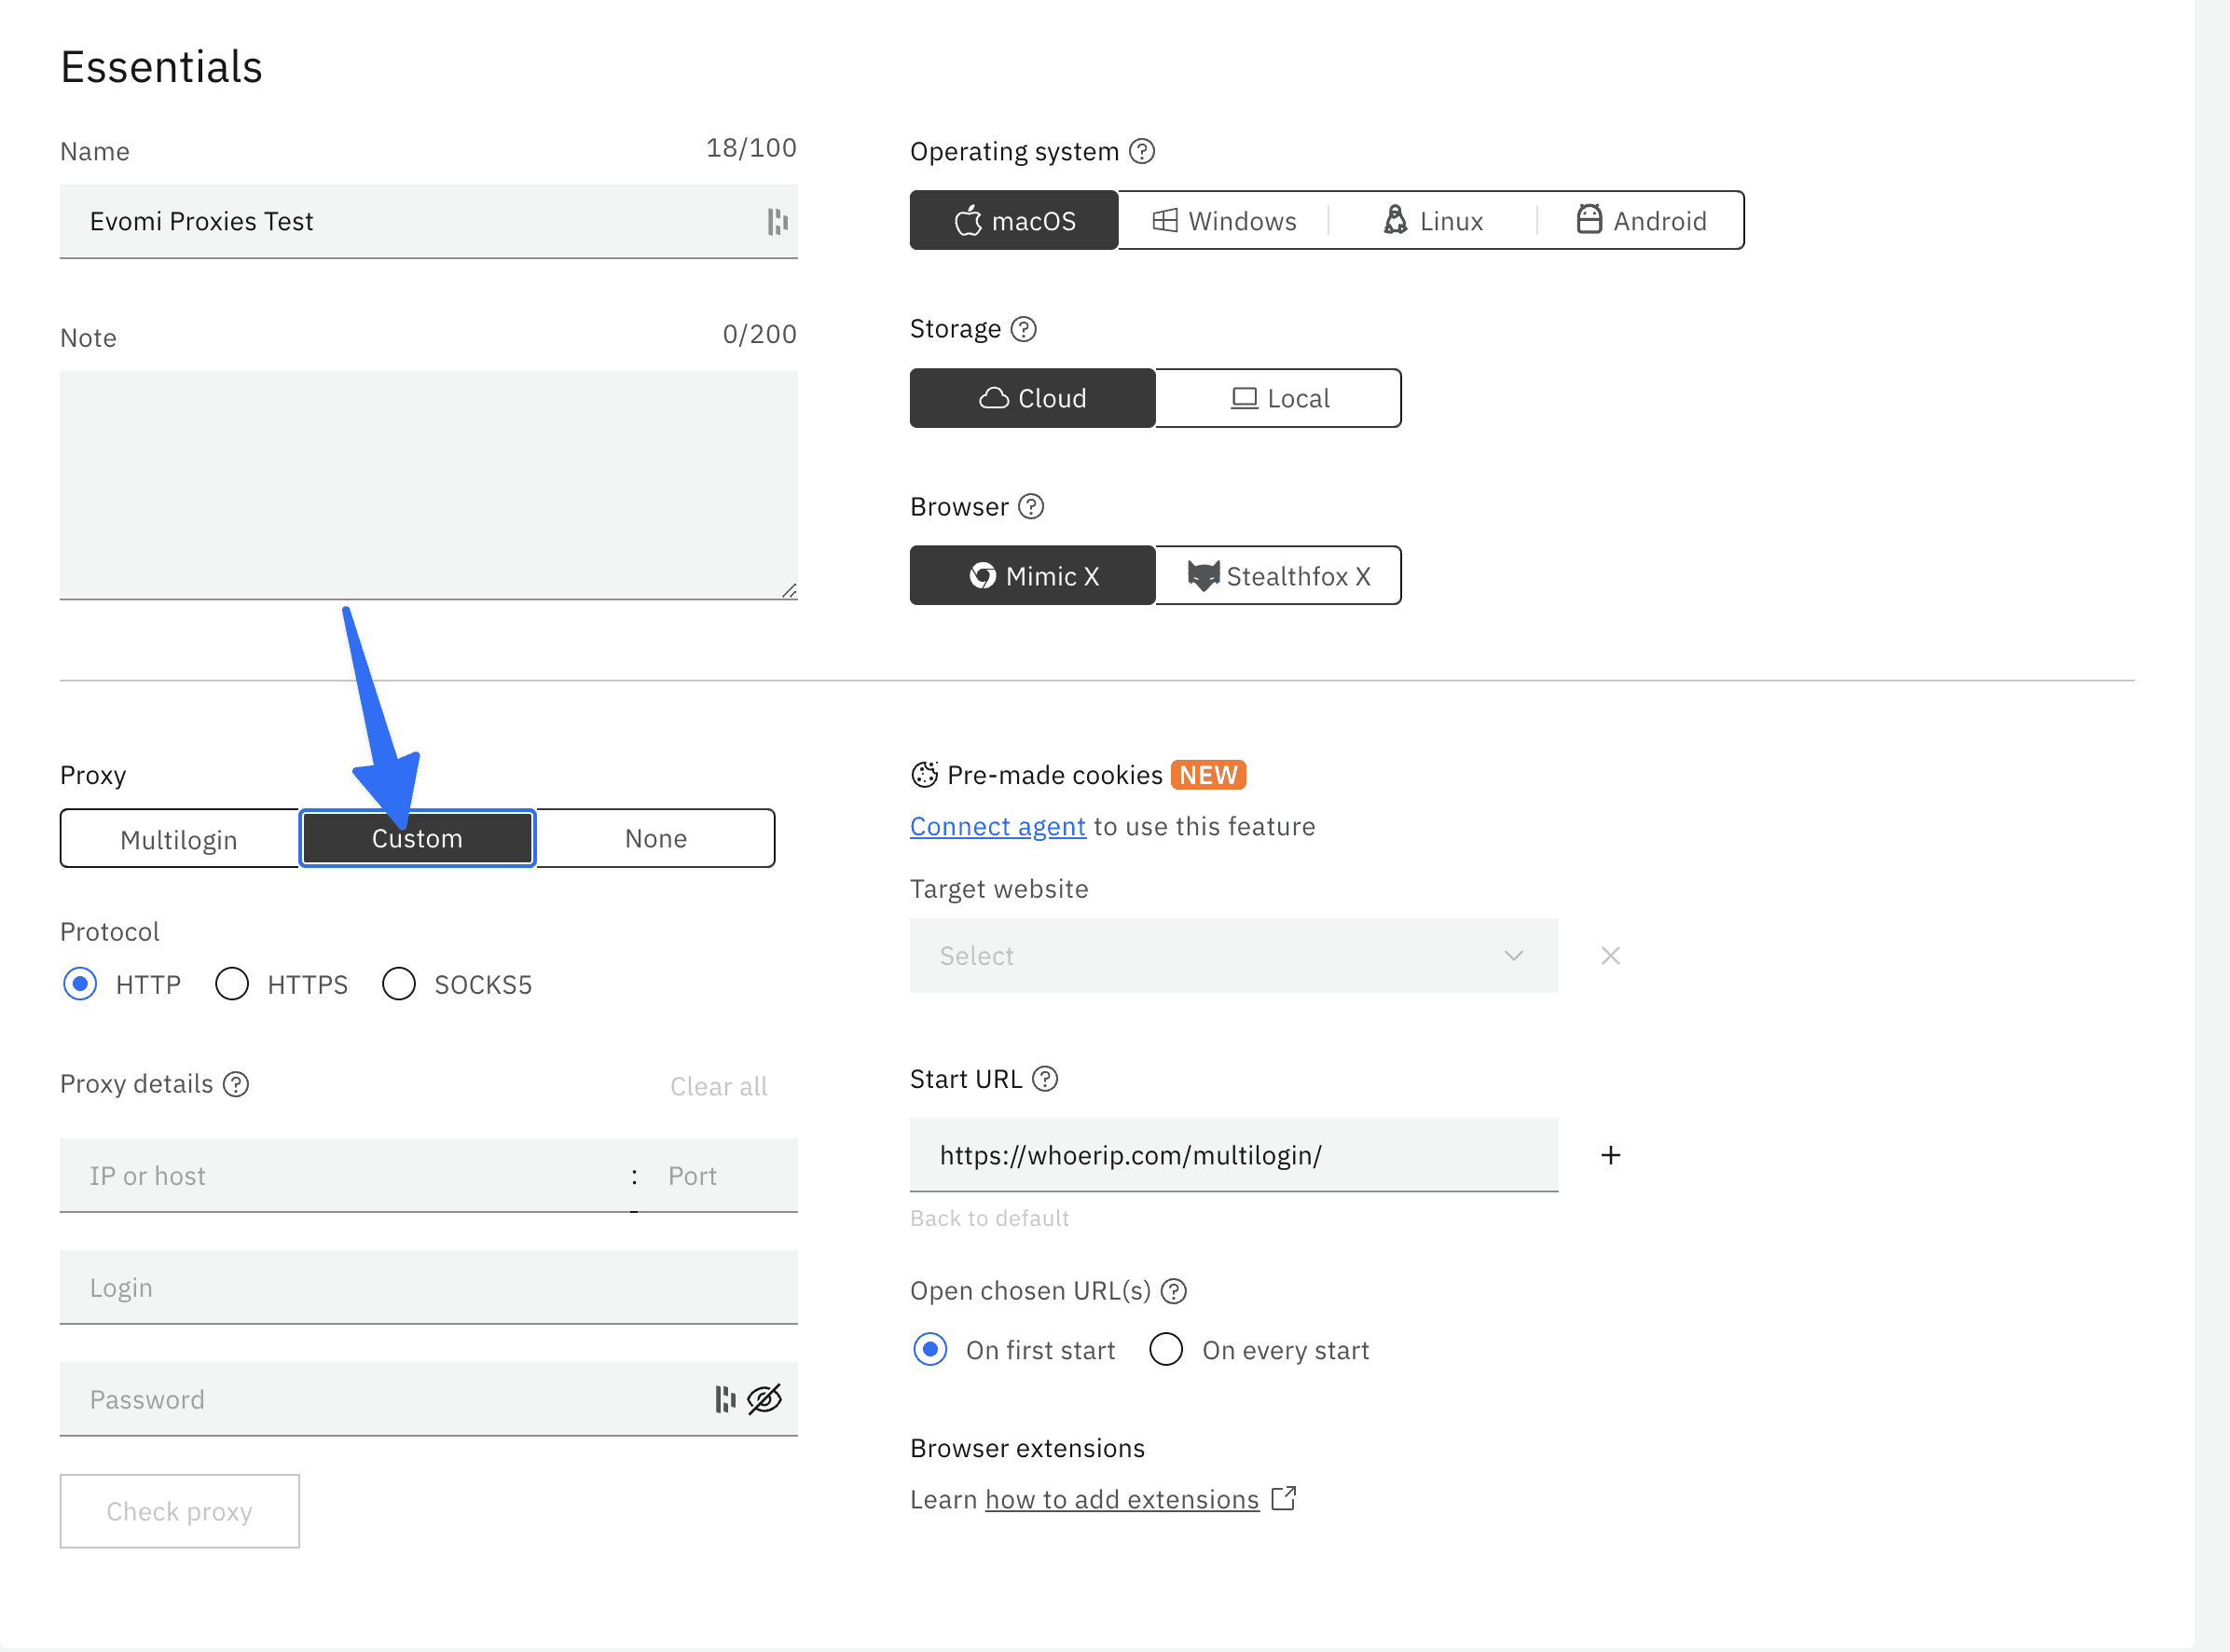
Selecting the Custom proxy type in Multilogin

Evomi supports both HTTP(S) and SOCKS5 for most proxy types, so make sure the protocol you select matches the port you plan to enter.

Step 3: Enter your Evomi proxy details

Once you've chosen a protocol, Multilogin shows fields for the proxy server details. Fill them in with the values from your Evomi dashboard.

Host / Address

  • Residential: rp.evomi.com

  • Datacenter: dc.evomi.com

  • Mobile: mp.evomi.com

  • Static ISP: the specific IP assigned to you

Port (depends on proxy type and protocol):

  • Residential (rp.evomi.com): HTTP 1000, HTTPS 1001, SOCKS5 1002

  • Datacenter (dc.evomi.com): HTTP 2000, HTTPS 2001, SOCKS5 2002

  • Mobile (mp.evomi.com): HTTP 3000, HTTPS 3001, SOCKS5 3002

  • Static ISP (your IP): HTTP 12345, SOCKS5 12346

Username and Password: your Evomi proxy credentials.

Enter each value into the matching field in Multilogin.
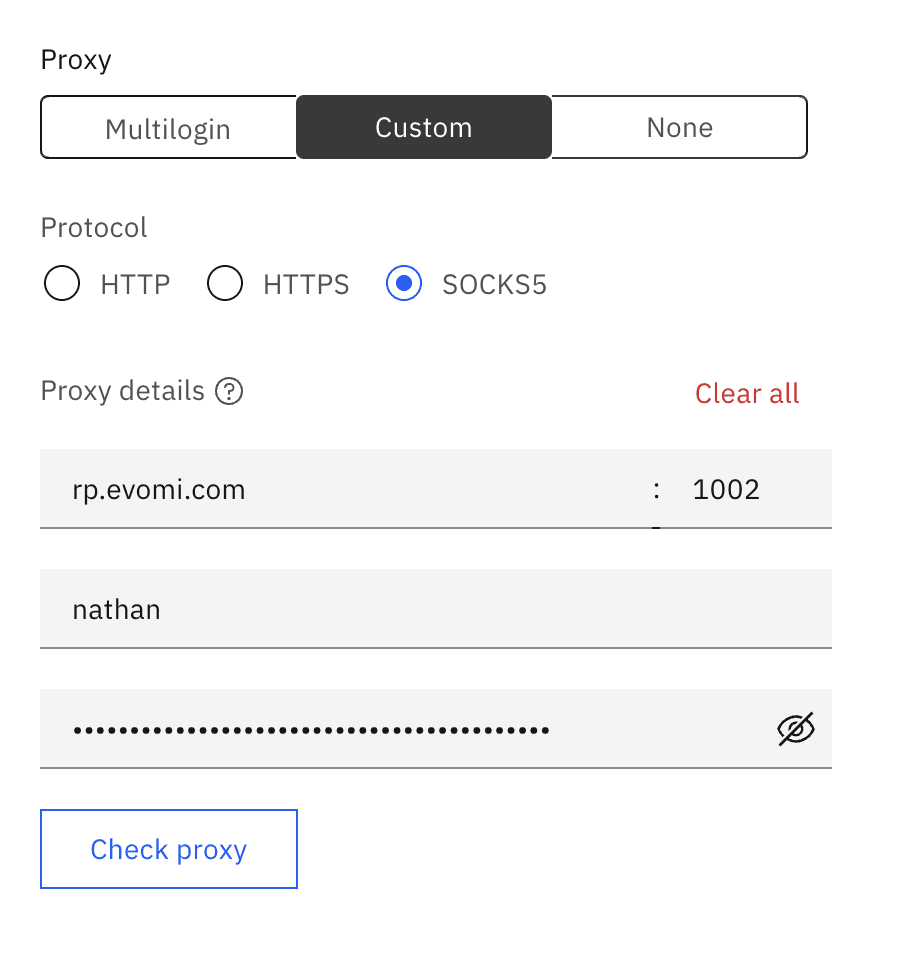
Entering Evomi proxy credentials in Multilogin

Tip: if you're using rotating residential or mobile proxies and want the same IP to persist across a task, use Evomi's session or sticky-session modifiers for better stability.

Step 4: Test the connection

Before saving, confirm the proxy works. Multilogin includes a Check proxy button that attempts a connection through your configured endpoint.
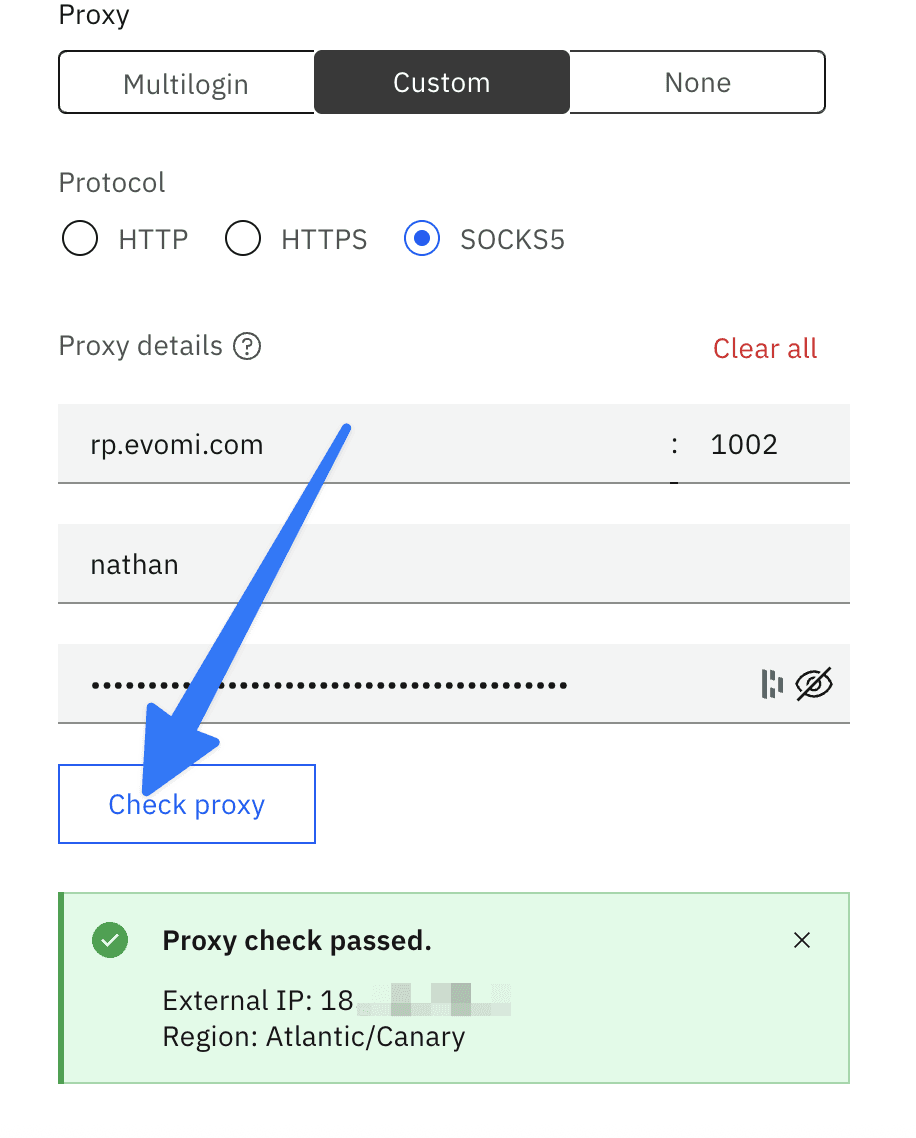
Testing the proxy connection in Multilogin

A successful test returns the proxy's IP address and location, which should match your Evomi settings. If it fails, recheck the credentials, endpoint, and port, and make sure your Evomi plan is active. Protocol mismatches (for example, entering a SOCKS5 port under an HTTP setting) are the most common cause of a failed check.

Step 5: Save the profile

Once the test passes, click Create profile. Your Multilogin profile will now route its traffic through the assigned Evomi proxy.

Verify your setup and follow good practice

After launching the profile, open an IP-checking page inside it, such as Evomi's IP geolocation tool, to confirm the traffic is going through your proxy and to see the reported location. A few habits worth keeping:

  • Match the proxy to the task: pick residential, datacenter, mobile, or static ISP based on your needs for location, speed, and IP type.

  • Keep credentials private: treat your proxy username and password like any other secret.

  • Understand session control: for rotating plans, learn how sticky sessions work via port or username modifiers when you need a consistent IP.

  • Check proxy health regularly: Multilogin's built-in checker and Evomi's Proxy Tester both help you confirm everything is responsive before a critical run.

If you'd rather validate your browser fingerprint separately, Evomi's fingerprint checker shows what a profile is exposing.

Related setup guides

Working across other tools? These walkthroughs use the same Evomi endpoints and credentials:

Bringing it together

Connecting Evomi proxies to Multilogin is a short, repeatable process: create a profile, pick the Custom proxy type, enter the right endpoint and port, test, and save. With Multilogin handling browser profiles and Evomi supplying stable, ethically sourced IPs, you get a dependable setup for legitimate multi-profile work, whether that's regional QA, research, or managing accounts you own within each platform's rules.


Managing several browser profiles for legitimate work, such as running multiple e-commerce storefronts you own, verifying how your ads render across regions, or doing market research, usually means keeping each profile's environment cleanly separated. Multilogin handles the browser side of that separation through configurable browser fingerprints, while a good proxy handles the network side by giving each profile a distinct, stable IP address. This guide shows you exactly how to connect Evomi proxies to Multilogin so each profile routes its traffic through the IP you choose.

Why pair Evomi proxies with Multilogin?

Multilogin is an browser profile manager that lets you assign a separate browser configuration to each profile. On its own, though, every profile still shares your real network IP. Assigning a dedicated proxy to each profile completes the picture. Here's what Evomi adds:

  • A full range of proxy types: Residential, datacenter, mobile, and static ISP proxies, so you can match the IP type to the task, whether that's regional QA, price research, or managing accounts you legitimately own.

  • Transparent pricing: residential from $0.49/GB, datacenter from $0.30/GB, mobile from $2.2/GB, and static ISP from $1/IP. See the full breakdown on the pricing page.

  • Ethically sourced IPs: our network is built on consent-based sourcing and operated from Switzerland, a jurisdiction with high standards for privacy and quality.

  • Responsive support for any proxy configuration questions, plus free tools to verify your setup.

Use Evomi proxies within the terms of service of the platforms you visit, and only for data and accounts you have the right to access.

Know your endpoints before you start

Every Evomi plan uses a dedicated hostname and a set of ports for each protocol. You'll find your exact credentials in your Evomi dashboard, but here's the layout you'll be working with:

  • Residential Proxies: real-user IPs for tasks that need a genuine consumer footprint. Endpoint: rp.evomi.com

  • Datacenter Proxies: fast, budget-friendly IPs for speed-sensitive research and testing. Endpoint: dc.evomi.com

  • Mobile Proxies: carrier-network IPs for mobile app QA and social workflows. Endpoint: mp.evomi.com

  • Static ISP Proxies: dedicated, long-lived IPs that pair datacenter speed with ISP-grade stability. Endpoint: your assigned IP

Before you begin: prerequisites

You'll want two things ready:

  • An active Multilogin subscription (the code EVOMI30 gives you 30% off).

  • Your Evomi proxy credentials: the endpoint, port, username, and password from your Evomi dashboard.

If you haven't tried Evomi yet, there's a free trial on residential, mobile, and datacenter proxies so you can test everything before you commit.

Step 1: Create a new browser profile

Open Multilogin and, from the dashboard, choose the option to create a new browser profile.

Creating a new browser profile in Multilogin

Give the profile a descriptive name, pick your operating system and browser type, and set any other fingerprint options you need for the task at hand.

Step 2: Open proxy settings and pick a connection type

Inside the profile creation or editing screen, find the Proxy section. Multilogin offers several connection types. To use Evomi, choose the Custom proxy type.

Selecting the Custom proxy type in Multilogin

Evomi supports both HTTP(S) and SOCKS5 for most proxy types, so make sure the protocol you select matches the port you plan to enter.

Step 3: Enter your Evomi proxy details

Once you've chosen a protocol, Multilogin shows fields for the proxy server details. Fill them in with the values from your Evomi dashboard.

Host / Address

  • Residential: rp.evomi.com

  • Datacenter: dc.evomi.com

  • Mobile: mp.evomi.com

  • Static ISP: the specific IP assigned to you

Port (depends on proxy type and protocol):

  • Residential (rp.evomi.com): HTTP 1000, HTTPS 1001, SOCKS5 1002

  • Datacenter (dc.evomi.com): HTTP 2000, HTTPS 2001, SOCKS5 2002

  • Mobile (mp.evomi.com): HTTP 3000, HTTPS 3001, SOCKS5 3002

  • Static ISP (your IP): HTTP 12345, SOCKS5 12346

Username and Password: your Evomi proxy credentials.

Enter each value into the matching field in Multilogin.

Entering Evomi proxy credentials in Multilogin

Tip: if you're using rotating residential or mobile proxies and want the same IP to persist across a task, use Evomi's session or sticky-session modifiers for better stability.

Step 4: Test the connection

Before saving, confirm the proxy works. Multilogin includes a Check proxy button that attempts a connection through your configured endpoint.

Testing the proxy connection in Multilogin

A successful test returns the proxy's IP address and location, which should match your Evomi settings. If it fails, recheck the credentials, endpoint, and port, and make sure your Evomi plan is active. Protocol mismatches (for example, entering a SOCKS5 port under an HTTP setting) are the most common cause of a failed check.

Step 5: Save the profile

Once the test passes, click Create profile. Your Multilogin profile will now route its traffic through the assigned Evomi proxy.

Verify your setup and follow good practice

After launching the profile, open an IP-checking page inside it, such as Evomi's IP geolocation tool, to confirm the traffic is going through your proxy and to see the reported location. A few habits worth keeping:

  • Match the proxy to the task: pick residential, datacenter, mobile, or static ISP based on your needs for location, speed, and IP type.

  • Keep credentials private: treat your proxy username and password like any other secret.

  • Understand session control: for rotating plans, learn how sticky sessions work via port or username modifiers when you need a consistent IP.

  • Check proxy health regularly: Multilogin's built-in checker and Evomi's Proxy Tester both help you confirm everything is responsive before a critical run.

If you'd rather validate your browser fingerprint separately, Evomi's fingerprint checker shows what a profile is exposing.

Related setup guides

Working across other tools? These walkthroughs use the same Evomi endpoints and credentials:

Bringing it together

Connecting Evomi proxies to Multilogin is a short, repeatable process: create a profile, pick the Custom proxy type, enter the right endpoint and port, test, and save. With Multilogin handling browser profiles and Evomi supplying stable, ethically sourced IPs, you get a dependable setup for legitimate multi-profile work, whether that's regional QA, research, or managing accounts you own within each platform's rules.

Author

Nathan Reynolds

Web Scraping & Automation Specialist

About Author

Nathan specializes in web scraping techniques, automation tools, and data-driven decision-making. He helps businesses extract valuable insights from the web using ethical and efficient scraping methods powered by advanced proxies. His expertise covers overcoming anti-bot mechanisms, optimizing proxy rotation, and ensuring compliance with data privacy regulations.

Like this article? Share it.
You asked, we answer - Users questions:
Which Evomi endpoint and port should I use in Multilogin?+
Should I choose HTTP or SOCKS5 in Multilogin?+
My proxy test failed in Multilogin. What should I check?+
How do I keep the same IP for a whole task with rotating proxies?+
Which Evomi proxy type is best for Multilogin profiles?+
Can I try Evomi proxies before subscribing?+

In This Article