Set Up Evomi Proxies in Octo Browser: Complete Guide


Michael Chen
Setup Guides
Octo Browser gives each profile its own distinct browser fingerprint, which makes it a solid choice for keeping separate work contexts organized: think managing several legitimately-owned client accounts, verifying ads across regions, or running QA against different locales. But a fingerprint is only one part of the equation. Each profile also needs a stable, geographically appropriate IP address, otherwise every profile shares your real connection and location. That's the gap Evomi fills.
Evomi provides ethically sourced proxies from a large global pool across residential, datacenter, and mobile networks. Routing an Octo Browser profile through an Evomi proxy means that profile presents a consistent IP and location that matches the region you're working with. This guide walks through the full setup, including sticky sessions and API-driven rotation.
What You'll Need Before Starting
The prerequisites are short:
An active Octo Browser account. You can use the promo code EVOMI30 for 30% off your first Octo Browser subscription (1 month).
An Evomi account. If you don't have one, sign up and use the free trial for residential, mobile, and datacenter proxies to follow along.
Your Evomi proxy credentials: the proxy username, password, and endpoints from your Evomi dashboard.
Your Evomi API key, which powers the on-demand rotation feature. It lives in your dashboard under your user profile.
Step-by-Step: Adding Evomi Proxies to Octo Browser
The whole process takes just a few minutes. Here's each step.
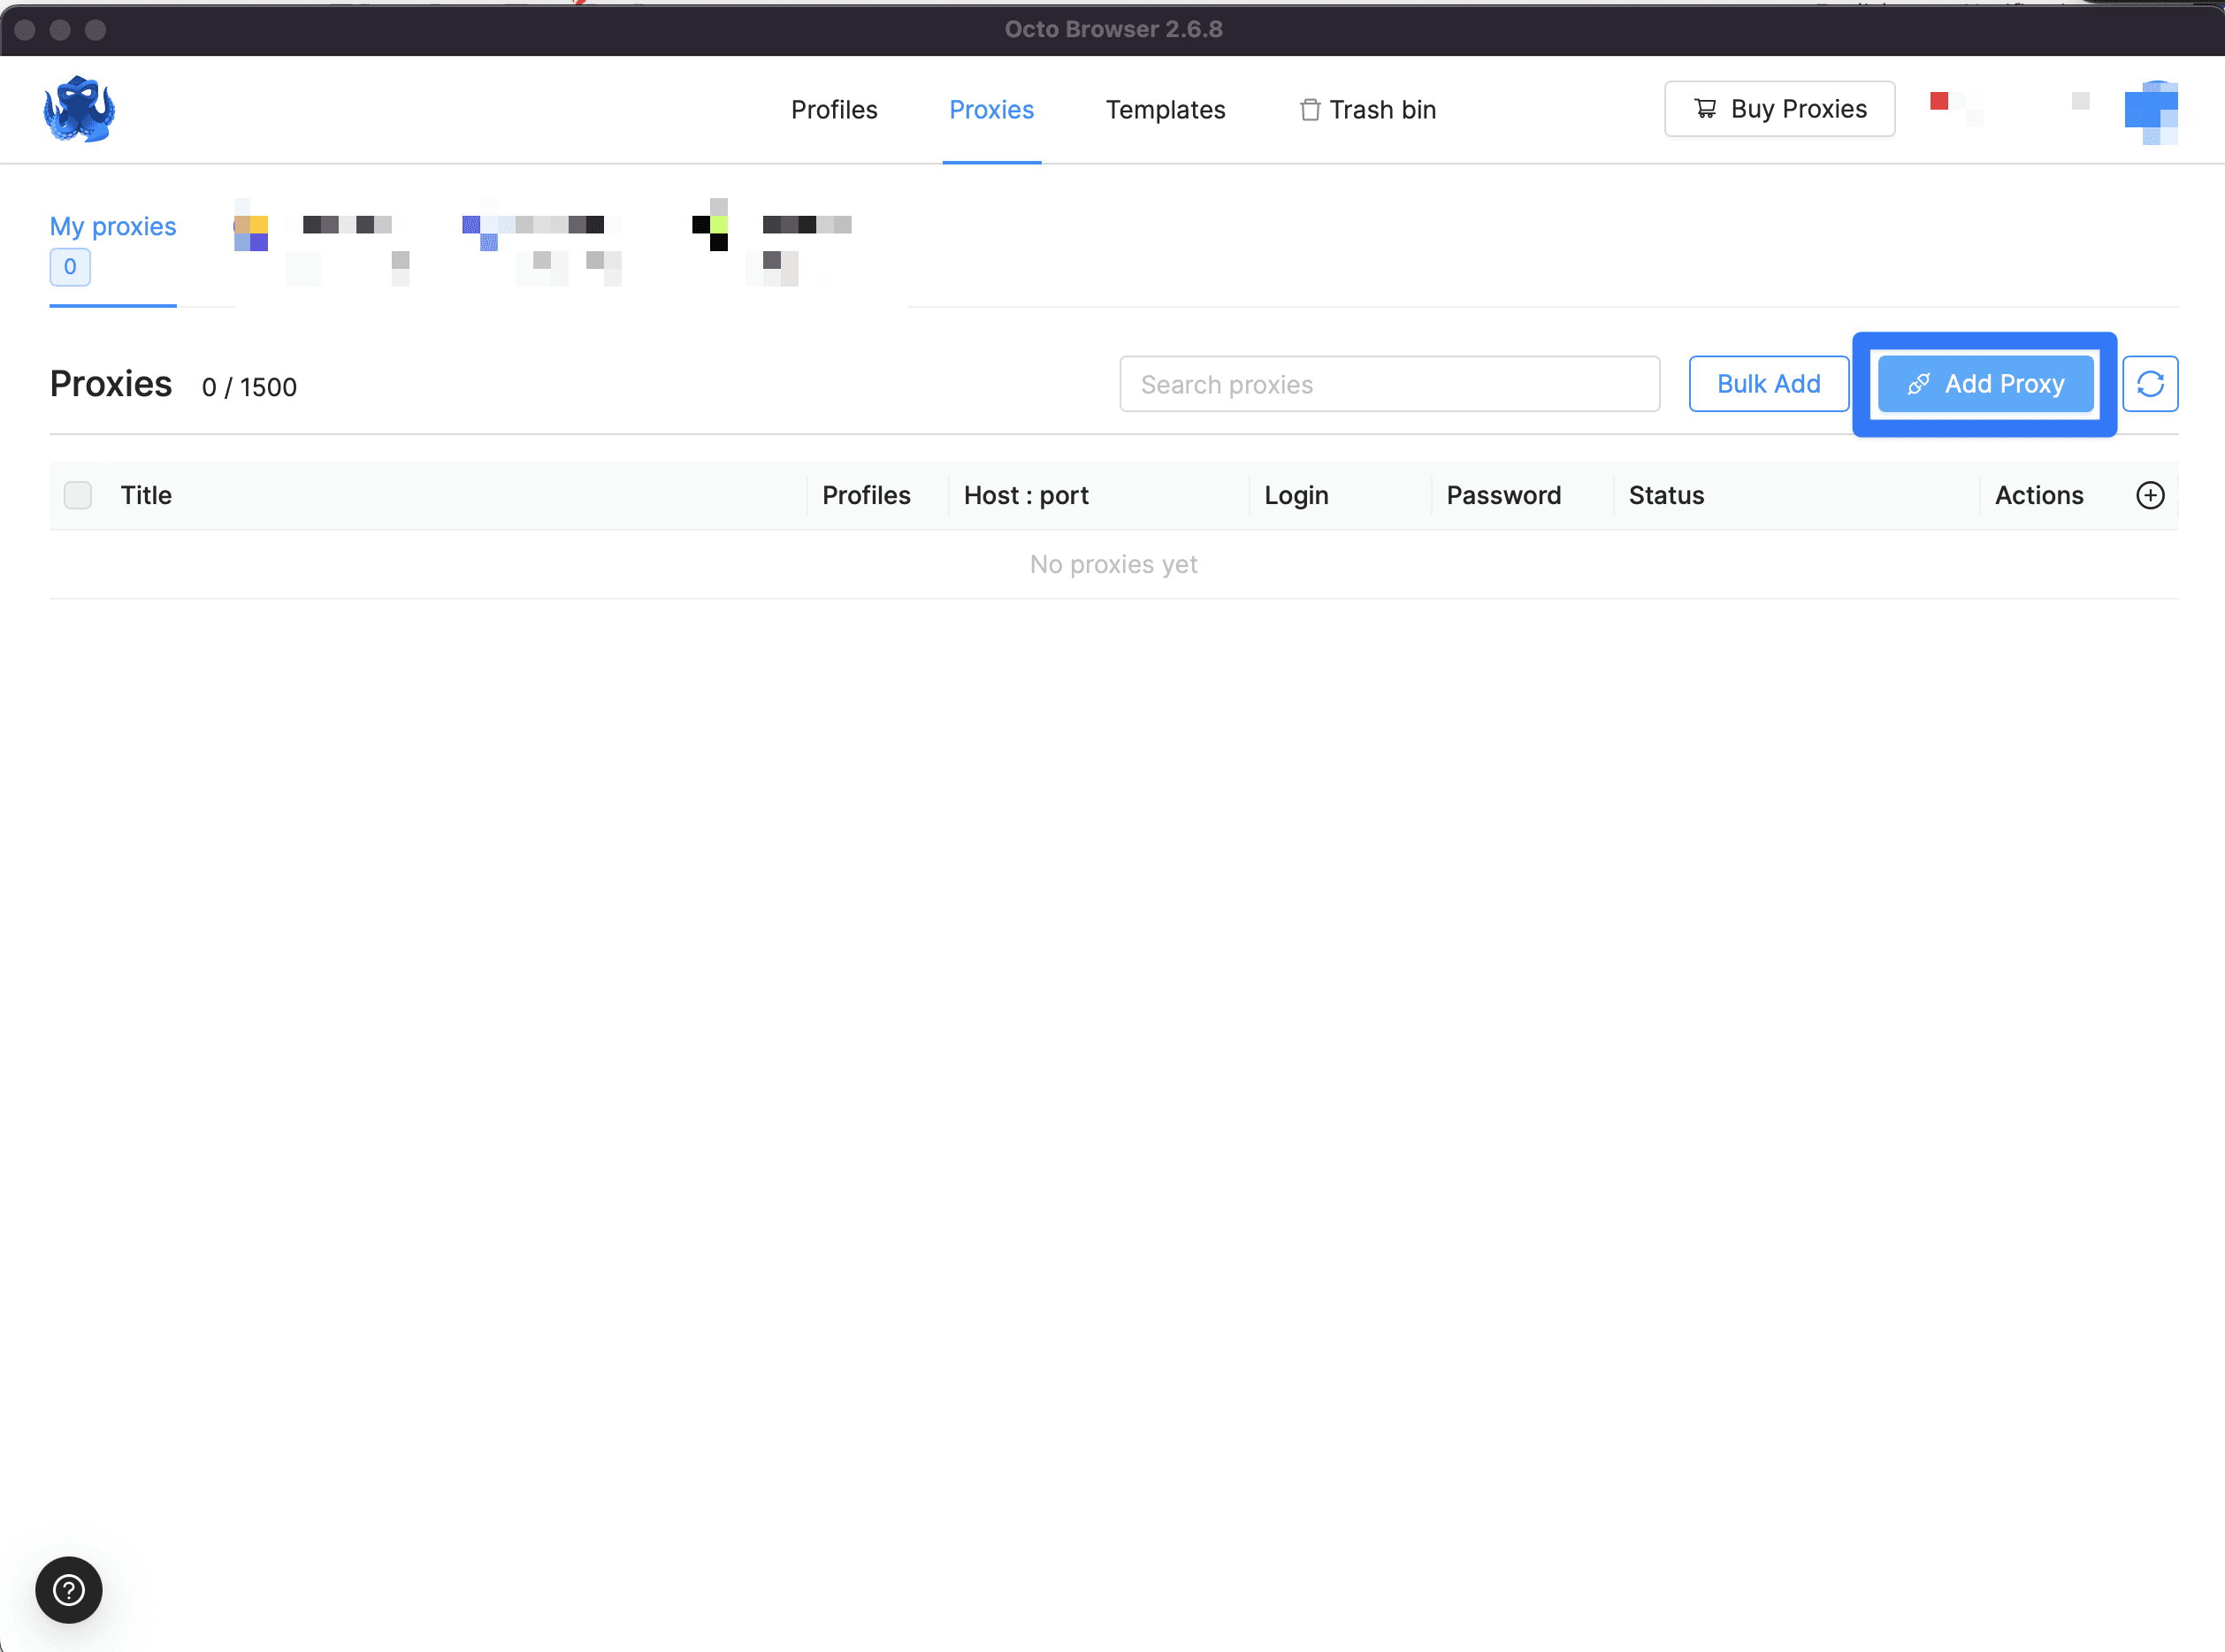
Step 1: Open the Proxy Manager
Launch Octo Browser. In the top menu you'll find a "Proxies" tab. Click it to open the Proxy Manager, where all your saved proxies are stored.

Step 2: Add a New Proxy
Inside the Proxy Manager, look for the button to add a new proxy — usually a blue "Add Proxy" button. Click it to open the configuration window.
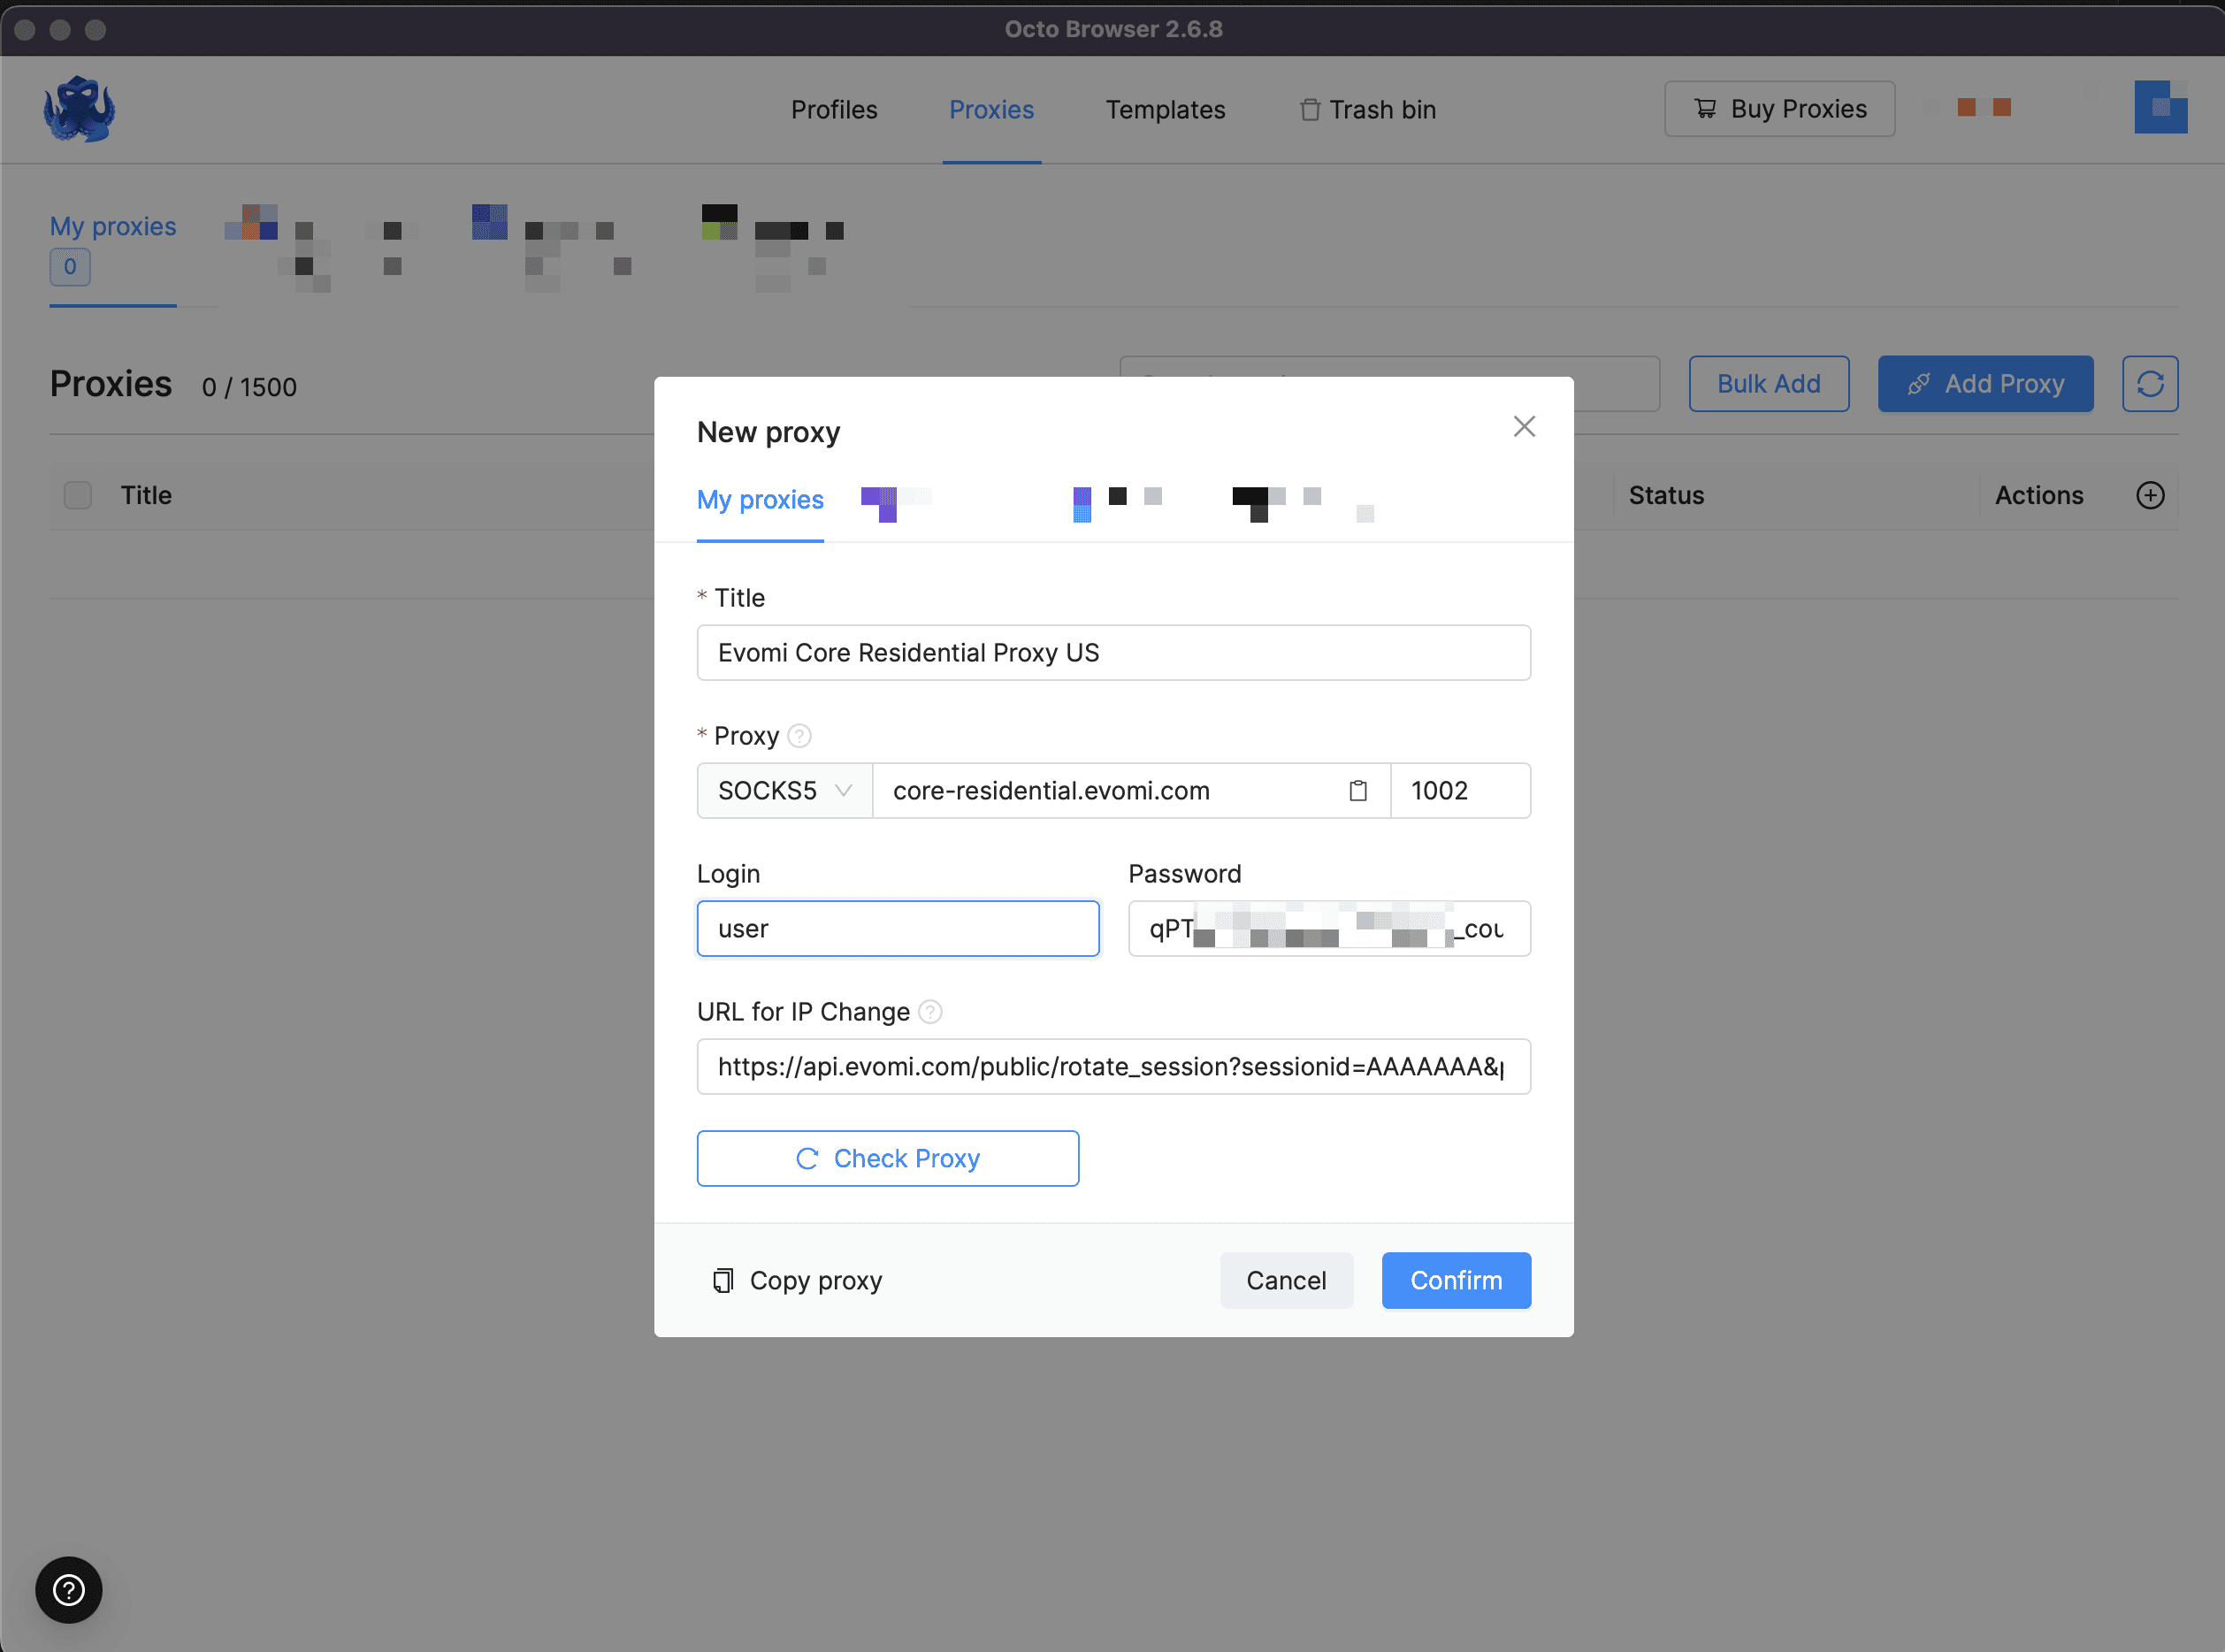
Step 3: Enter Your Evomi Proxy Details
This is the core step. Octo Browser gives you a form for the proxy details. You can either paste a single-line proxy string (ctrl/cmd + v) or fill the fields individually.
An Evomi proxy string follows this shape:
Here's how to complete each field:
Title: A memorable label, such as "Evomi Residential US" or "Evomi DC – Task 1".
Proxy Type: The protocol you want. Evomi supports HTTP, HTTPS, and SOCKS5.
Host & Port: The Evomi endpoint and port for your chosen product. For residential proxies over HTTP, use
rp.evomi.comas the host and1000as the port.Login & Password: Your proxy username and password from the Evomi dashboard.
Pro Tip: Sticky Sessions for a Consistent IP
Many tasks need the same IP address for a stretch of time — keeping a session coherent while you complete a workflow, for instance. Evomi handles this with session control. To create a sticky session, add a session parameter to your proxy username. The session ID must be a unique alphanumeric string, 6 to 10 characters long.
For a session named "socialtsk5", your password field becomes:
Every profile that uses this exact username is assigned the same residential or mobile IP, which keeps activity within a single profile consistent and predictable.
Advanced: On-Demand IP Rotation
When you want to request a fresh IP from the same pool without editing any settings, Octo Browser's "URL to change IP" field works directly with the Evomi API. Paste this URL into that field:
https://api.evomi.com/public/rotate_session?sessionid=SESSIONID&product=PRODUCT&apikeyReplace the placeholders:
SESSIONID: Must match the session name in your username (e.g. "socialtsk5").PRODUCT: The proxy type — "rpc" for Residential Core, "mp" for Mobile, or "dc" for Datacenter.YOUR_API_KEY: Your API key from the Evomi dashboard profile section.
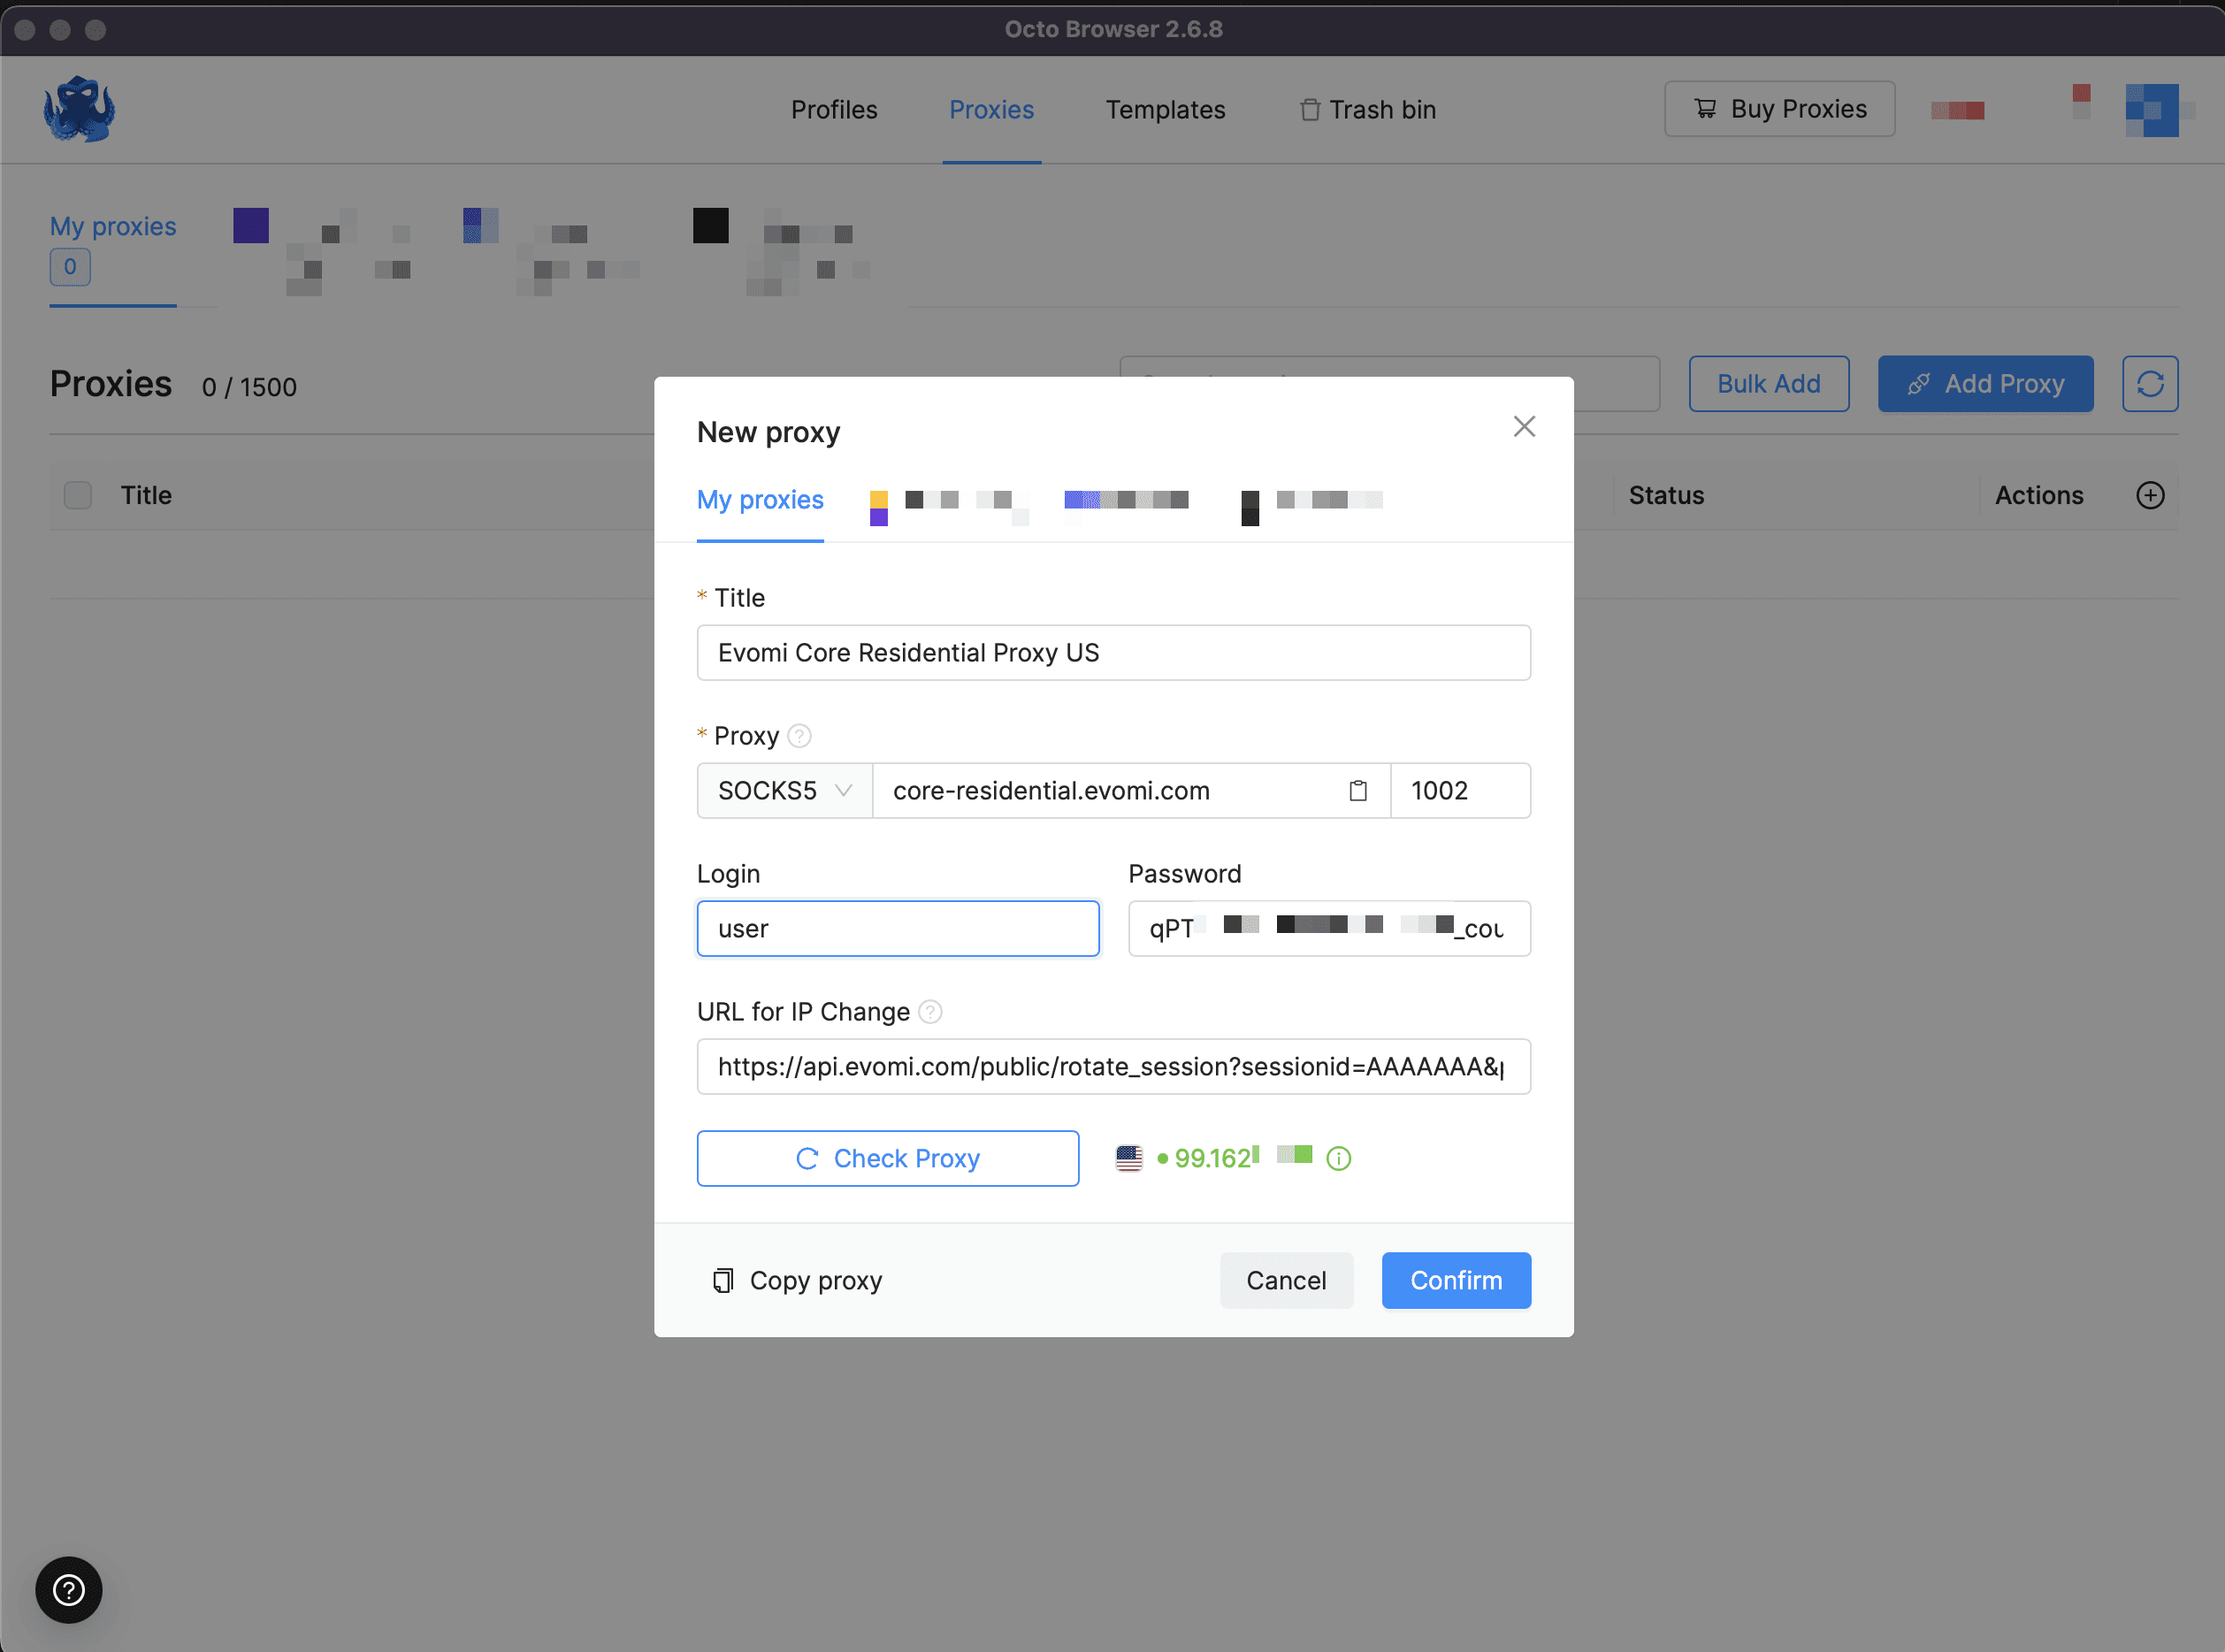
Step 4: Test the Connection
With the details in place, verify the connection. Octo Browser has a built-in "Check Proxy" button — click it and wait a moment. A correct configuration shows a green "Active" status alongside the IP address and its location. That confirms you're ready.
After saving, assign the proxy to any new or existing Octo Browser profile. When you launch the profile, confirm the IP's location with our free IP Geolocation Checker, and review the browser fingerprint with the Fingerprint Checker.
You're All Set
Your Evomi proxies are now integrated with Octo Browser. Matching the right proxy product to each task and using sticky sessions where consistency matters gives you a clean, organized setup for legitimate work like ad verification, market research, localized QA, and managing accounts you own.
If you're configuring proxies across other tools too, our step-by-step guides for GoLogin and Multilogin follow the same pattern. And every Evomi plan includes free, unlimited access to Evomium, our own browser built to work with the Evomi network out of the box.
Any questions? Our support team is always happy to help.
Octo Browser gives each profile its own distinct browser fingerprint, which makes it a solid choice for keeping separate work contexts organized: think managing several legitimately-owned client accounts, verifying ads across regions, or running QA against different locales. But a fingerprint is only one part of the equation. Each profile also needs a stable, geographically appropriate IP address, otherwise every profile shares your real connection and location. That's the gap Evomi fills.
Evomi provides ethically sourced proxies from a large global pool across residential, datacenter, and mobile networks. Routing an Octo Browser profile through an Evomi proxy means that profile presents a consistent IP and location that matches the region you're working with. This guide walks through the full setup, including sticky sessions and API-driven rotation.
What You'll Need Before Starting
The prerequisites are short:
An active Octo Browser account. You can use the promo code EVOMI30 for 30% off your first Octo Browser subscription (1 month).
An Evomi account. If you don't have one, sign up and use the free trial for residential, mobile, and datacenter proxies to follow along.
Your Evomi proxy credentials: the proxy username, password, and endpoints from your Evomi dashboard.
Your Evomi API key, which powers the on-demand rotation feature. It lives in your dashboard under your user profile.
Step-by-Step: Adding Evomi Proxies to Octo Browser
The whole process takes just a few minutes. Here's each step.
Step 1: Open the Proxy Manager
Launch Octo Browser. In the top menu you'll find a "Proxies" tab. Click it to open the Proxy Manager, where all your saved proxies are stored.
Step 2: Add a New Proxy
Inside the Proxy Manager, look for the button to add a new proxy — usually a blue "Add Proxy" button. Click it to open the configuration window.
Step 3: Enter Your Evomi Proxy Details
This is the core step. Octo Browser gives you a form for the proxy details. You can either paste a single-line proxy string (ctrl/cmd + v) or fill the fields individually.
An Evomi proxy string follows this shape:
Here's how to complete each field:
Title: A memorable label, such as "Evomi Residential US" or "Evomi DC – Task 1".
Proxy Type: The protocol you want. Evomi supports HTTP, HTTPS, and SOCKS5.
Host & Port: The Evomi endpoint and port for your chosen product. For residential proxies over HTTP, use
rp.evomi.comas the host and1000as the port.Login & Password: Your proxy username and password from the Evomi dashboard.
Pro Tip: Sticky Sessions for a Consistent IP
Many tasks need the same IP address for a stretch of time — keeping a session coherent while you complete a workflow, for instance. Evomi handles this with session control. To create a sticky session, add a session parameter to your proxy username. The session ID must be a unique alphanumeric string, 6 to 10 characters long.
For a session named "socialtsk5", your password field becomes:
Every profile that uses this exact username is assigned the same residential or mobile IP, which keeps activity within a single profile consistent and predictable.
Advanced: On-Demand IP Rotation
When you want to request a fresh IP from the same pool without editing any settings, Octo Browser's "URL to change IP" field works directly with the Evomi API. Paste this URL into that field:
https://api.evomi.com/public/rotate_session?sessionid=SESSIONID&product=PRODUCT&apikeyReplace the placeholders:
SESSIONID: Must match the session name in your username (e.g. "socialtsk5").PRODUCT: The proxy type — "rpc" for Residential Core, "mp" for Mobile, or "dc" for Datacenter.YOUR_API_KEY: Your API key from the Evomi dashboard profile section.
Step 4: Test the Connection
With the details in place, verify the connection. Octo Browser has a built-in "Check Proxy" button — click it and wait a moment. A correct configuration shows a green "Active" status alongside the IP address and its location. That confirms you're ready.
After saving, assign the proxy to any new or existing Octo Browser profile. When you launch the profile, confirm the IP's location with our free IP Geolocation Checker, and review the browser fingerprint with the Fingerprint Checker.
You're All Set
Your Evomi proxies are now integrated with Octo Browser. Matching the right proxy product to each task and using sticky sessions where consistency matters gives you a clean, organized setup for legitimate work like ad verification, market research, localized QA, and managing accounts you own.
If you're configuring proxies across other tools too, our step-by-step guides for GoLogin and Multilogin follow the same pattern. And every Evomi plan includes free, unlimited access to Evomium, our own browser built to work with the Evomi network out of the box.
Any questions? Our support team is always happy to help.

Author
Michael Chen
AI & Network Infrastructure Analyst
About Author
Michael bridges the gap between artificial intelligence and network security, analyzing how AI-driven technologies enhance proxy performance and security. His work focuses on AI-powered anti-detection techniques, predictive traffic routing, and how proxies integrate with machine learning applications for smarter data access.


